

So, have you ever wondered about installing an in-ground trampoline in your backyard? I mean, who wouldn’t want their own little bounce paradise, right? Well, I’m here to tell you that it’s totally doable and not as complicated as you might think. In this ultimate guide, I’ll walk you through all the steps and everything you need to know about installing an in-ground trampoline. Trust me, by the end of this article, you’ll have all the knowledge and confidence to turn your backyard into the ultimate bouncing heaven.
First things first, let’s talk about the installation process. Now, I won’t lie to you, it does require a bit of digging and some manual labor, but hey, nothing worth having comes easy, right? The good news is that you won’t have to do it alone – there are plenty of guides and tutorials out there that can help you along the way. In this article, we’ll go through all the steps in detail, from choosing the perfect spot in your backyard to properly preparing the ground, and finally, setting up the trampoline itself. Whether you’re a seasoned DIY-er or a complete newbie, don’t worry – I got your back. So stick around and let’s dive into the exciting world of in-ground trampoline installation!
The Ultimate Guide to In-Ground Trampolines: Installation
Why Choose an In-Ground Trampoline?
When it comes to trampolines, the traditional option is the above-ground variety. However, more and more people are considering in-ground trampolines for their homes. There are several reasons why an in-ground trampoline may be the right choice for you.
Enhanced Safety
One of the main advantages of an in-ground trampoline is increased safety. Traditional above-ground trampolines come with a risk of falling off and potentially injuring oneself. With an in-ground trampoline, the risk of falling from a height is eliminated. The trampoline is level with the ground, making it much safer for both children and adults.
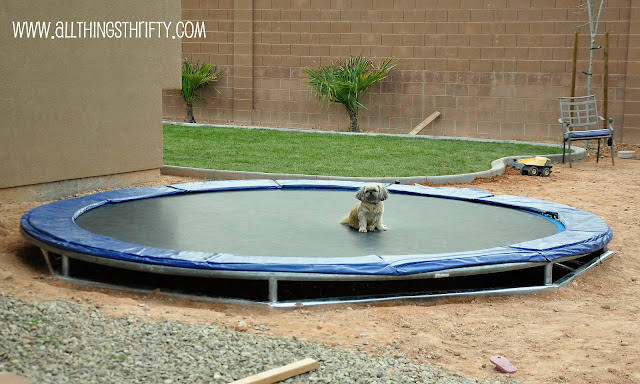
Improved Aesthetic Appeal
In-ground trampolines also have the advantage of improved aesthetic appeal. Traditional trampolines can be an eyesore in your backyard, obstructing the view and clashing with the overall look of your outdoor space. On the other hand, an in-ground trampoline blends seamlessly into the surroundings, creating a clean and attractive look.
Longer Lifespan
Another benefit of installing an in-ground trampoline is its longer lifespan. Above-ground trampolines are exposed to the elements and can deteriorate quickly, especially if not properly maintained. In-ground trampolines, on the other hand, are protected by the ground and are less likely to suffer from wear and tear caused by weather conditions. This means that your investment will last longer and provide more enjoyment for years to come.
Planning and Preparation
Before you start the installation process, proper planning and preparation are essential. Here are some steps to consider:
Evaluate Your Yard
The first step in planning for an in-ground trampoline is to evaluate your yard. Consider the available space and make sure there is enough room to accommodate the trampoline. Take into account any existing structures or landscaping features that may need to be adjusted or removed to make way for the trampoline.
Check Local Regulations
It is important to check with your local authorities to ensure that there are no restrictions or regulations regarding the installation of in-ground trampolines. Some areas may have specific guidelines or permits that need to be obtained before starting the project.
Select the Right Spot
Choosing the right spot for your in-ground trampoline is crucial. Look for an area that is level and free of obstructions such as trees or underground utilities. It should also be easily accessible and have enough space around it to ensure safe jumping.

Required Tools and Materials
To successfully install an in-ground trampoline, you will need the following tools and materials:
Trampolines Kit
First and foremost, you will need a trampoline kit that includes all the necessary components for installation. This typically includes the frame, springs, mat, and safety enclosure. Make sure to choose a high-quality kit that is suitable for your specific needs.
Excavation Tools
To dig the hole for the trampoline, you will need excavation tools such as a shovel, a spade, and a wheelbarrow. These tools will help you remove soil and debris from the site.
Safety Equipment
During the installation process, it is important to prioritize safety. Make sure to have safety equipment on hand, such as gloves, goggles, and sturdy footwear. This will protect you from potential injuries while working on the project.
Excavation Process
Once you have gathered all the necessary tools and materials, you can begin the excavation process. Follow these steps to prepare the ground for the in-ground trampoline:
Mark Out the Area
Start by marking out the area where the trampoline will be installed. Use stakes and twine to create a clear outline of the hole. This will help you visualize the size and shape of the hole.
Digging the Hole
Using your excavation tools, start digging the hole according to the dimensions specified by the trampoline kit. Make sure to dig deep enough to accommodate the frame and springs, but not so deep that the trampoline is too low to the ground. It is recommended to dig about 2 feet deeper than the height of the trampoline.
Removing Excess Soil
After digging the hole, remove any excess soil and debris from the site. This will help ensure a level and stable base for the trampoline. Use a wheelbarrow to transport the soil away from the area or repurpose it for other landscaping projects.

Installing the Trampoline
Now that the excavation process is complete, you can begin installing the trampoline. Follow these steps to ensure a successful installation:
Assemble the Frame
Start by assembling the frame of the trampoline according to the manufacturer’s instructions. This usually involves connecting the metal poles and securing them in place. Make sure to tighten all the bolts and screws to ensure a sturdy frame.
Attach Springs and Mat
Once the frame is assembled, attach the springs to the frame and connect them to the mat. This step requires some physical strength and coordination, so it may be helpful to have an extra set of hands. Make sure that the springs are evenly spaced and securely attached to the frame and mat.
Secure Safety Enclosure
Finally, secure the safety enclosure around the perimeter of the trampoline. Follow the manufacturer’s instructions to properly attach the enclosure to the frame. This will provide an additional layer of safety and prevent anyone from accidentally falling off the trampoline while jumping.
Adding Safety Features
While in-ground trampolines already offer enhanced safety compared to their above-ground counterparts, there are additional safety features that can be added to further protect users. Consider the following options:
Padding and Sides
To prevent injuries caused by accidental contact with the frame or springs, consider adding padding to the sides of the trampoline. This will create a cushioned barrier that reduces the risk of injury.
Anchor Systems
To secure the trampoline to the ground and prevent it from shifting or overturning, consider using an anchor system. This is especially important in areas with high winds or heavy rainfall, as it will ensure the trampoline remains stable and safe.
Access Ladder
Installing an access ladder can make it easier to get on and off the trampoline, especially for younger children or individuals with limited mobility. Make sure to choose a ladder that is specifically designed for use with in-ground trampolines.

Proper Drainage System
To prevent water accumulation and potential damage to the trampoline, it is important to have a proper drainage system in place. Consider the following steps:
Installing Drainage Pipes
Digging a trench around the perimeter of the trampoline and installing drainage pipes can help redirect excess water away from the area. This will prevent water from pooling around the trampoline and causing damage.
Preventing Water Accumulation
In addition to drainage pipes, there are other measures you can take to prevent water accumulation. Make sure the ground surrounding the trampoline is properly sloped to encourage water runoff. You can also consider using gravel or a permeable surface around the trampoline to allow water to seep into the ground.
Maintenance and Upkeep
To ensure the longevity and safe use of your in-ground trampoline, regular maintenance and upkeep are essential. Here are some important steps to follow:
Regular Cleaning
It is important to regularly clean the trampoline to remove dirt, debris, and any potential hazards. Use a soft brush or broom to sweep off the mat and frame. Avoid using harsh chemicals or abrasive cleaners that could damage the surface of the trampoline.
Inspecting for Wear and Tear
Regularly inspect the trampoline for any signs of wear and tear. Check the frame, springs, and mat for any damage or loose components. If you notice any issues, make sure to address them promptly to avoid further damage and ensure the safety of users.
Replacing Parts
Over time, certain parts of the trampoline may need to be replaced. Springs, mats, and safety enclosures can wear out and lose their effectiveness over time. Make sure to purchase high-quality replacement parts from the manufacturer to ensure proper fit and performance.

Landscaping Around the Trampoline
To create an attractive and functional outdoor space, consider landscaping around your in-ground trampoline. Here are a couple of ideas:
Planting Soft Surfaces
Planting soft surfaces such as grass or low-growing plants around the trampoline can help create a cushioned landing area and enhance the overall aesthetic appeal. Make sure to choose plants that are durable and can withstand the foot traffic.
Creating an Attractive Surrounding
In addition to soft surfaces, consider adding decorative elements such as garden beds, rocks, or pavers around the trampoline. This will help create an attractive and inviting space that complements the trampoline.
Conclusion
Installing an in-ground trampoline can provide countless hours of fun and entertainment for the whole family. Not only does it enhance safety, but it also improves the aesthetic appeal of your outdoor space. By following the steps outlined in this guide, you can successfully install and maintain your in-ground trampoline for years to come. So, go ahead and take the leap into the world of in-ground trampolines – you won’t regret it!